Sending Split Impressions to S3
What is Split and S3?
Split is the premier feature delivery platform. Using Split, you do targeted rollouts of new functionality, testing for positive impact to ensure business impact each step of the way.
Amazon Simple Storage Service (Amazon S3) is an object storage service that offers industry-leading scalability, data availability, security, and performance. AWS customers can teach Split to write its impressions to S3.
What’s an impression? When Split decides whether or not to give a feature, or treatment, to a user, that decision is logged into a simple record along with the name of the split (feature flag) and the user’s identifier. Impressions can be exported at the SDK level, or with a webhook. This article talks about writing impressions to S3.
Setup Split
Signup for Split
If you haven’t created a free account, visit the signup page.
Create a Feature Flag
- Once in a the product, create a new split.
- Call your split “s3_integration”.
- Give your split a “user” traffic type and click Create.
- Click to Add Rules in your Production environment.
- Click the Save changes button and Confirm.
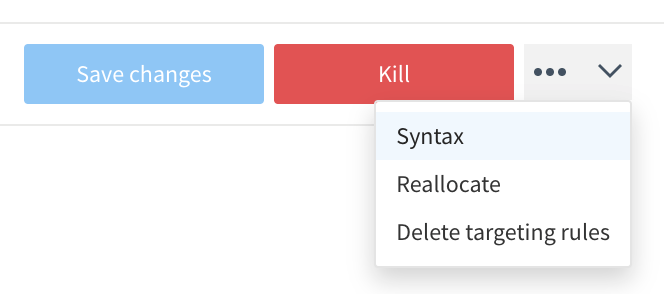
Now we’re going to take some code out by clicking the Syntax button on the dropdown menu next to the Kill button:
- Choose JavaScript
- Copy the code, which should look like the following:
var factory = splitio({
  core: {
    authorizationKey: 'your client-side sdk key',
    key: 'user_id' // unique identifier for your user
  }
});

var client = factory.client();

client.on(client.Event.SDK_READY, function() {
  var treatment = client.getTreatment('s3_integration');

  if (treatment === 'on') {
      // insert on code here
  }   else   if (treatment === 'off') {
      // insert off code here
  }   else {
      // insert control code here
  }

});
Copy the Split JavaScript include
//cdn.split.io/sdk/split-10.15.9.min.js
You can find the latest on Split’s support site, help.split.io.
Put your Split all together into an HTML page
Using your favorite text editor, create a s3.html file
<html>
<head>
<script src="//cdn.split.io/sdk/split-10.15.9.min.js"></script>
<script>

var factory = splitio({
  core: {
    authorizationKey: 'your client-side sdk key',
    key: 'user_id' // unique identifier for your user
  }
});

var client = factory.client();

client.on(client.Event.SDK_READY, function() {
  var treatment = client.getTreatment('s3_integration');

  if (treatment === 'on') {
      document.body.style.backgroundColor="white";
  }   else   if (treatment === 'off') {
      document.body.style.backgroundColor = "black";
  }   else {
      // insert control code here
  }

});
</script>
</head>
<body>
Hello Split World!
</body>
</html>
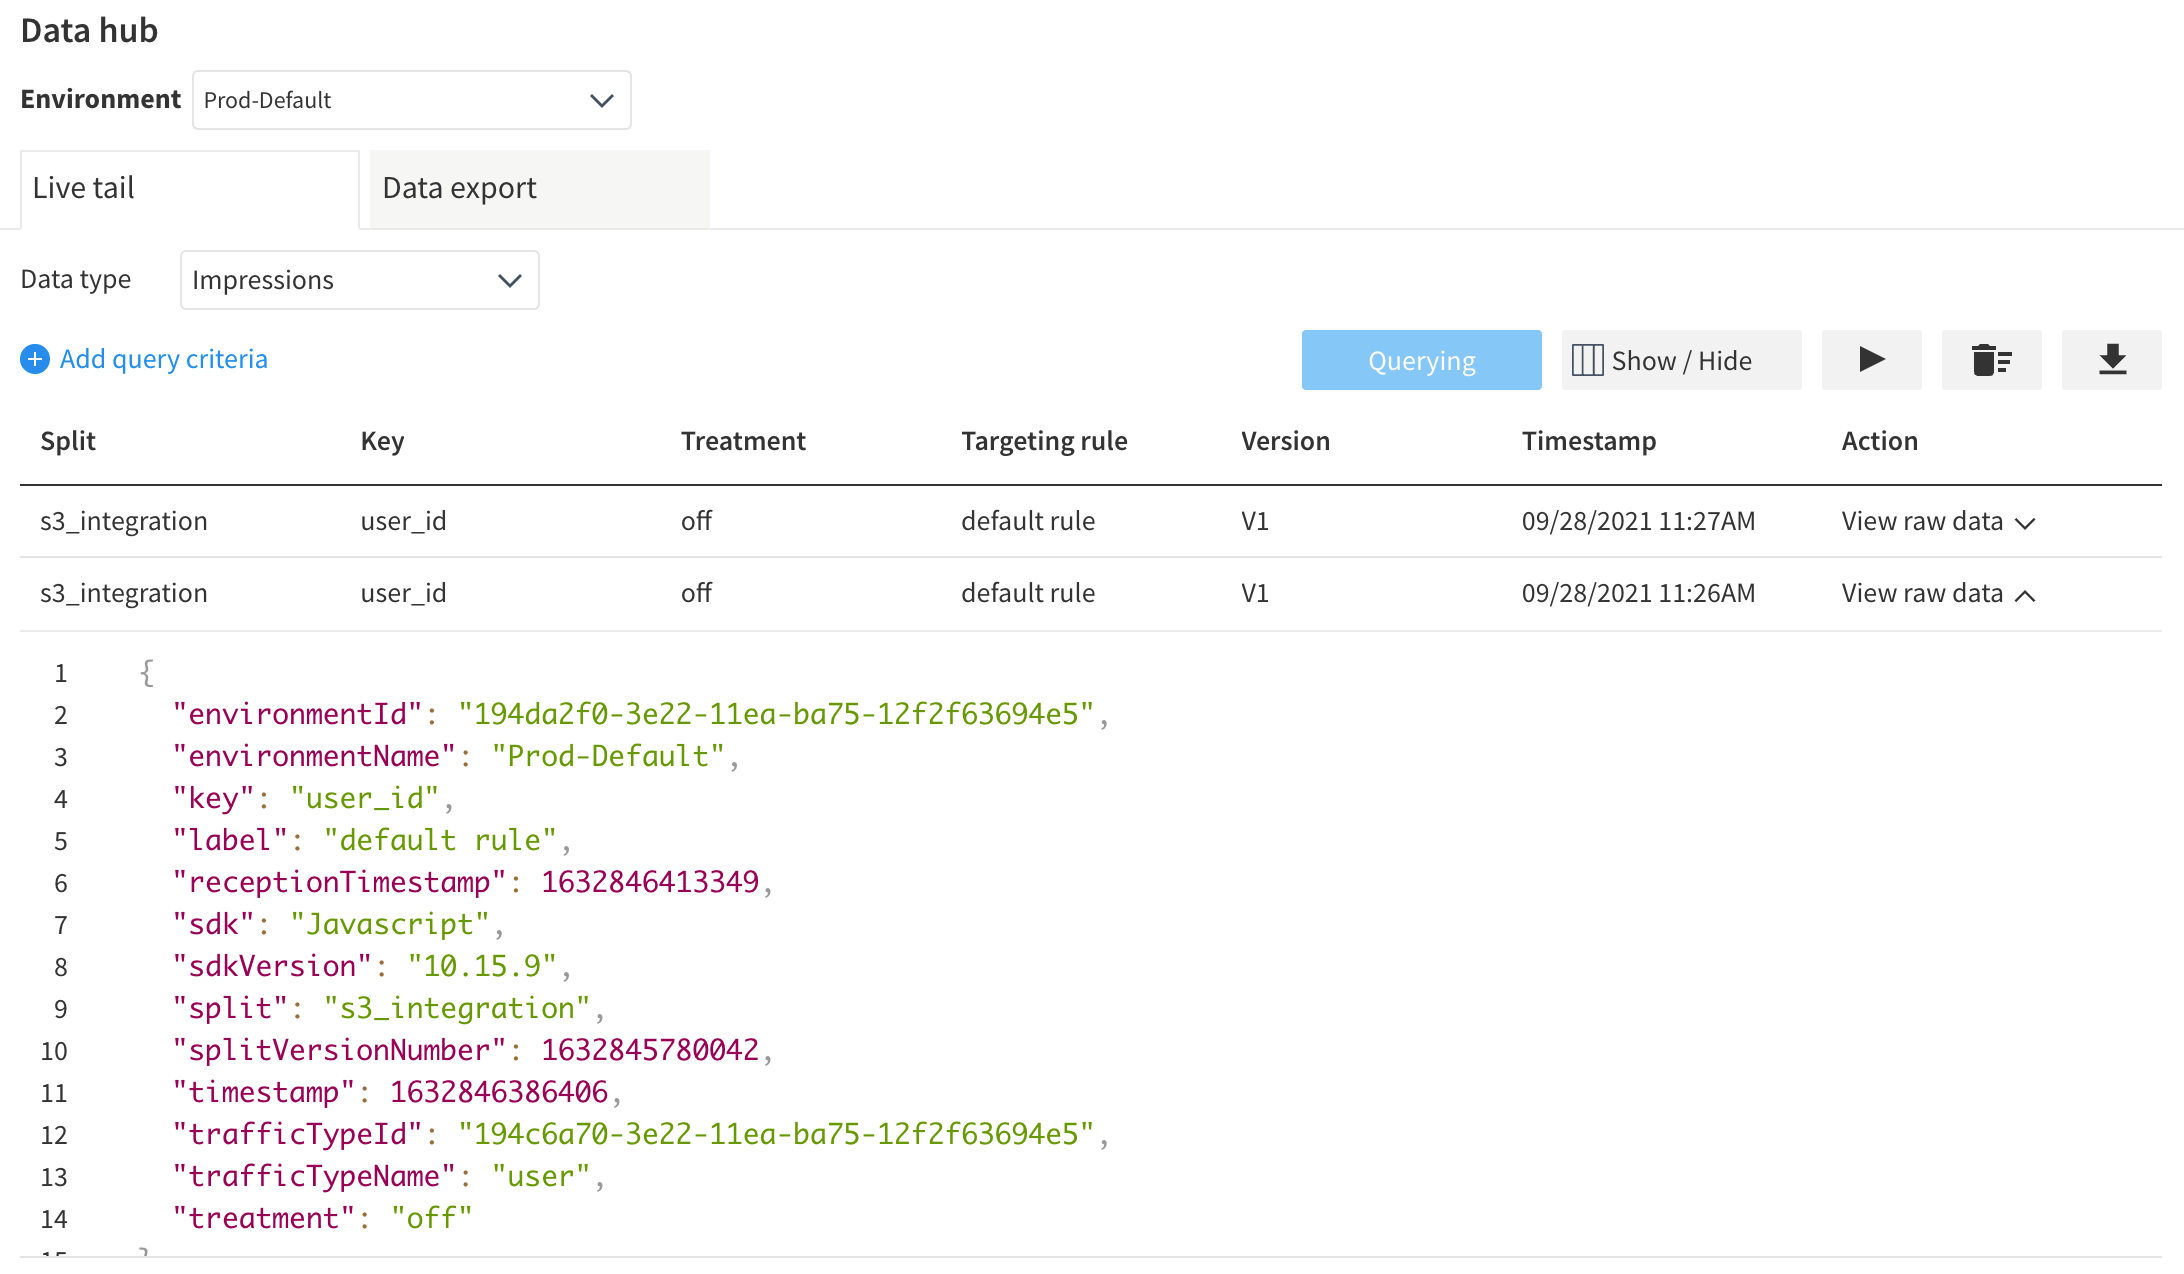
Use Data Hub to Listen for Impressions
- Find Data Hub button (bottom left of navigation bar) and hit the Query button to capture live impressions
- Load or reload your s3.html in your favorite browser.
- Observe your new impressions…
Setting up S3
Now that you’ve set up Split to capture and send impressions, we move to setting up S3 to catch them. Here, the author assumes his audience to have some sophistication with AWS. If you don’t have access to an AWS account, you will have to consult a colleague before proceeding.
Create a Bucket
In AWS, go to S3 and create a bucket. Call it split-impressions and note which region.
Configure the Bucket in Split
- In the Split UI, navigate to admin settings, click integrations, select your workspace, and navigate to the marketplace.
- Click add next to Amazon S3. (You can also click _Warehouse_ under _Categories_ to filter to Amazon S3.)
- Under Send Impressions to S3, click Add configuration
- Under Select environment, choose which Split environments that will receive S3 data.
- Under Paste S3 bucket name, provide the name split-impressions
- Leave the write location prefix blank
- Select file format JSON
- Choose compression format GZIP
Click Save. Go back into your new configuration and copy the Role ARN.
For example:
arn:aws:iam::56366123456:role/databricks-prod
Give the Bucket the Right Permissions
Back in AWS
- In the Amazon S3 console, navigate to your S3 bucket.
- Under Permissions > Edit bucket policy > Bucket policy, replace the JSON with the snippet below. Be sure to replace the following parameters in the snippet:
- {role-ARN-to-be-provided-to-you-by-Split} with the Role ARN generated by Split above.
- {bucketName} with your S3 bucket name
{
    "Version": "2012-10-17",
    "Statement": [
        {
            "Effect": "Allow",
            "Principal": {
                "AWS": "arn:aws:iam::123546136:role/databricks-prod"
            },
            "Action": "s3:ListBucket",
            "Resource": "arn:aws:s3:::split-impressions"
        },
        {
            "Effect": "Allow",
            "Principal": {
                "AWS": "arn:aws:iam::123546136:role/databricks-prod"
            },
            "Action": [
                "s3:PutObject",
                "s3:PutObjectAcl",
                "s3:DeleteObject"
            ],
            "Resource": "arn:aws:s3:::split-impressions/*"
        }
    ]
}
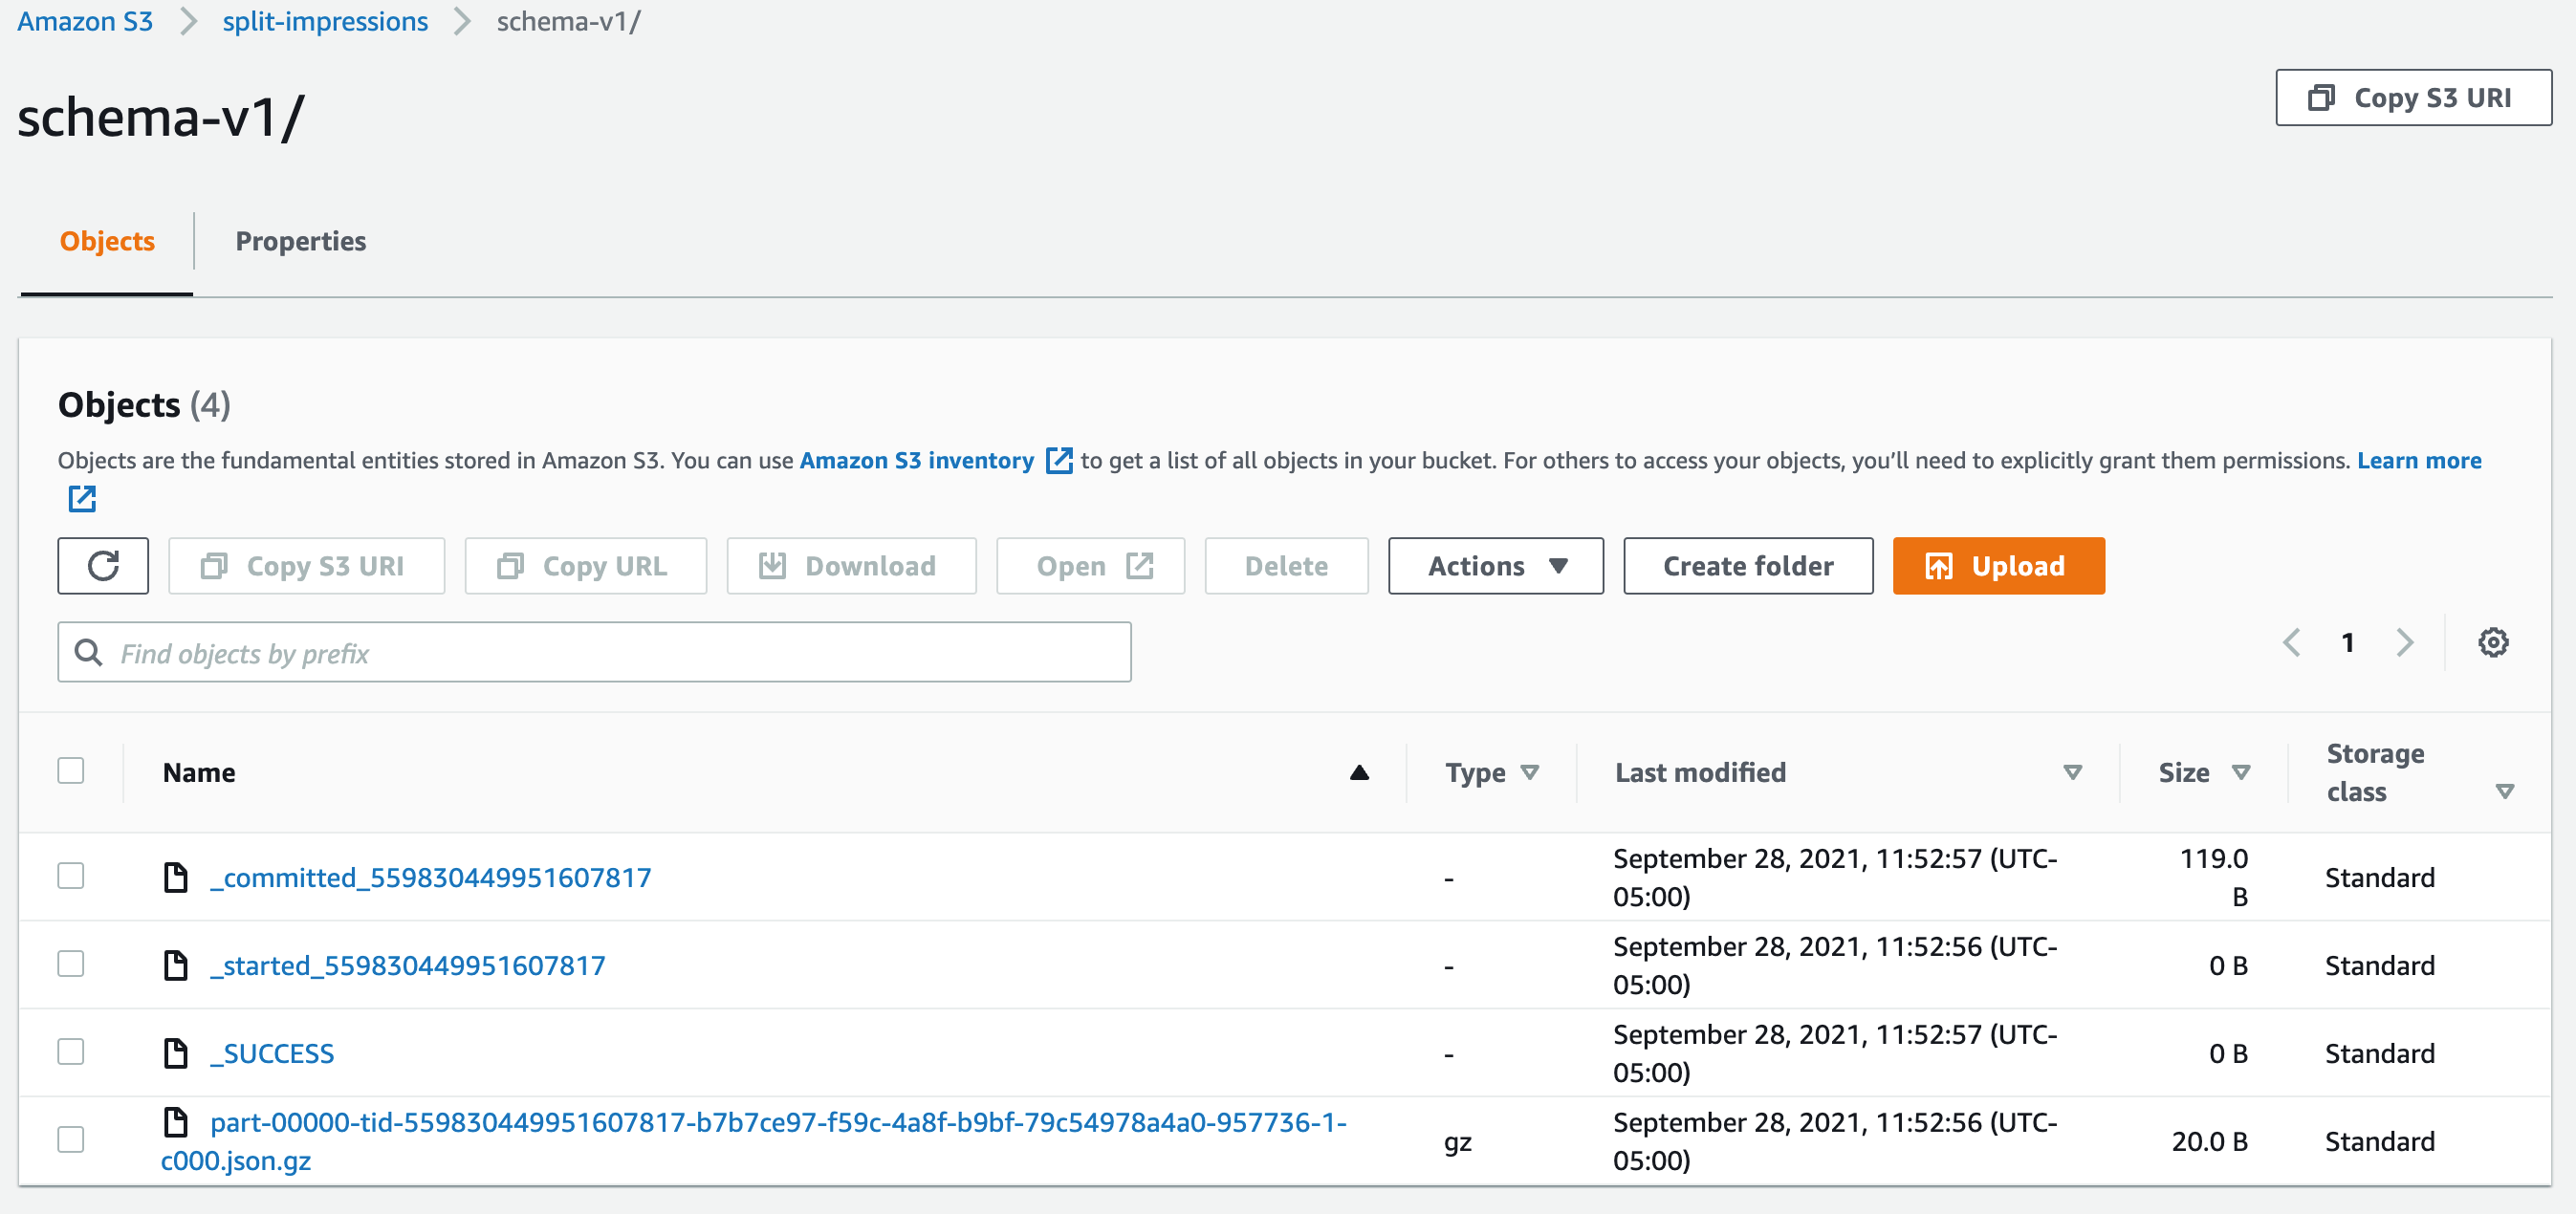
Find Impressions in Your Bucket
Reload your s3.html page. Check that Live Tail is showing new impressions.
It will take a few minutes for the impressions to be written. If all goes well, your bucket will look like this:
Advanced: Read and Process with a Lambda
Now that the impressions data is in S3, what can you do with it? In the example below, I’ll create a Lambda that can read impressions right out of the S3 bucket into which Split is writing them. It’s up to the reader to decide the best way to fully implement the Lambda: e.g. pass to a database or a business intelligence tool.
I chose to implement the AWS Lambda with node.js and the AWS SDK. On a mac, you can start with with node.js by installing the node.js package manager:
brew install npm
Create an Impressions Reader Lambda
- Create a directory for your new Lambda to live locally.
- In your new directory, run:
npm init
This will lay down the necessary skeleton for your Lambda. I used two different libraries that must be npm installed:
npm install aws-sdk
npm install zlib
Now you can create the main script. Create a new file called index.js and substitute in your AWS access key and secret access key.
var AWS = require("aws-sdk");
const zlib = require("zlib");
AWS.config.update({
accessKeyId: "your AWS access key ID",
secretAccessKey: "your AWS secret access key",
"region": "us-west-2" // this was mine
});
exports.handler = async (event) => {
s3 = new AWS.S3({apiVersion: '2006-03-01'});
var params = {
// just as we named it earlier
Bucket: "split-impressions",
};
let gzipFiles = [];
await s3.listObjects(params, function(err, data) {
if (err) {
console.log(err, err.stack);
} else {
let contents = data.Contents;
for(const content of contents) {
if(content.Key.endsWith('.json.gz')) {
gzipFiles.push(content.Key);
}
}
}
}).promise();
console.log("found " + gzipFiles.length + " gzipped json file...");
for(const filename of gzipFiles) {
var objectParams = {
Bucket: 'split-impressions',
Key: filename
}
await s3.getObject(objectParams, async function(err, data) {
if (err) {
console.log(err);
}
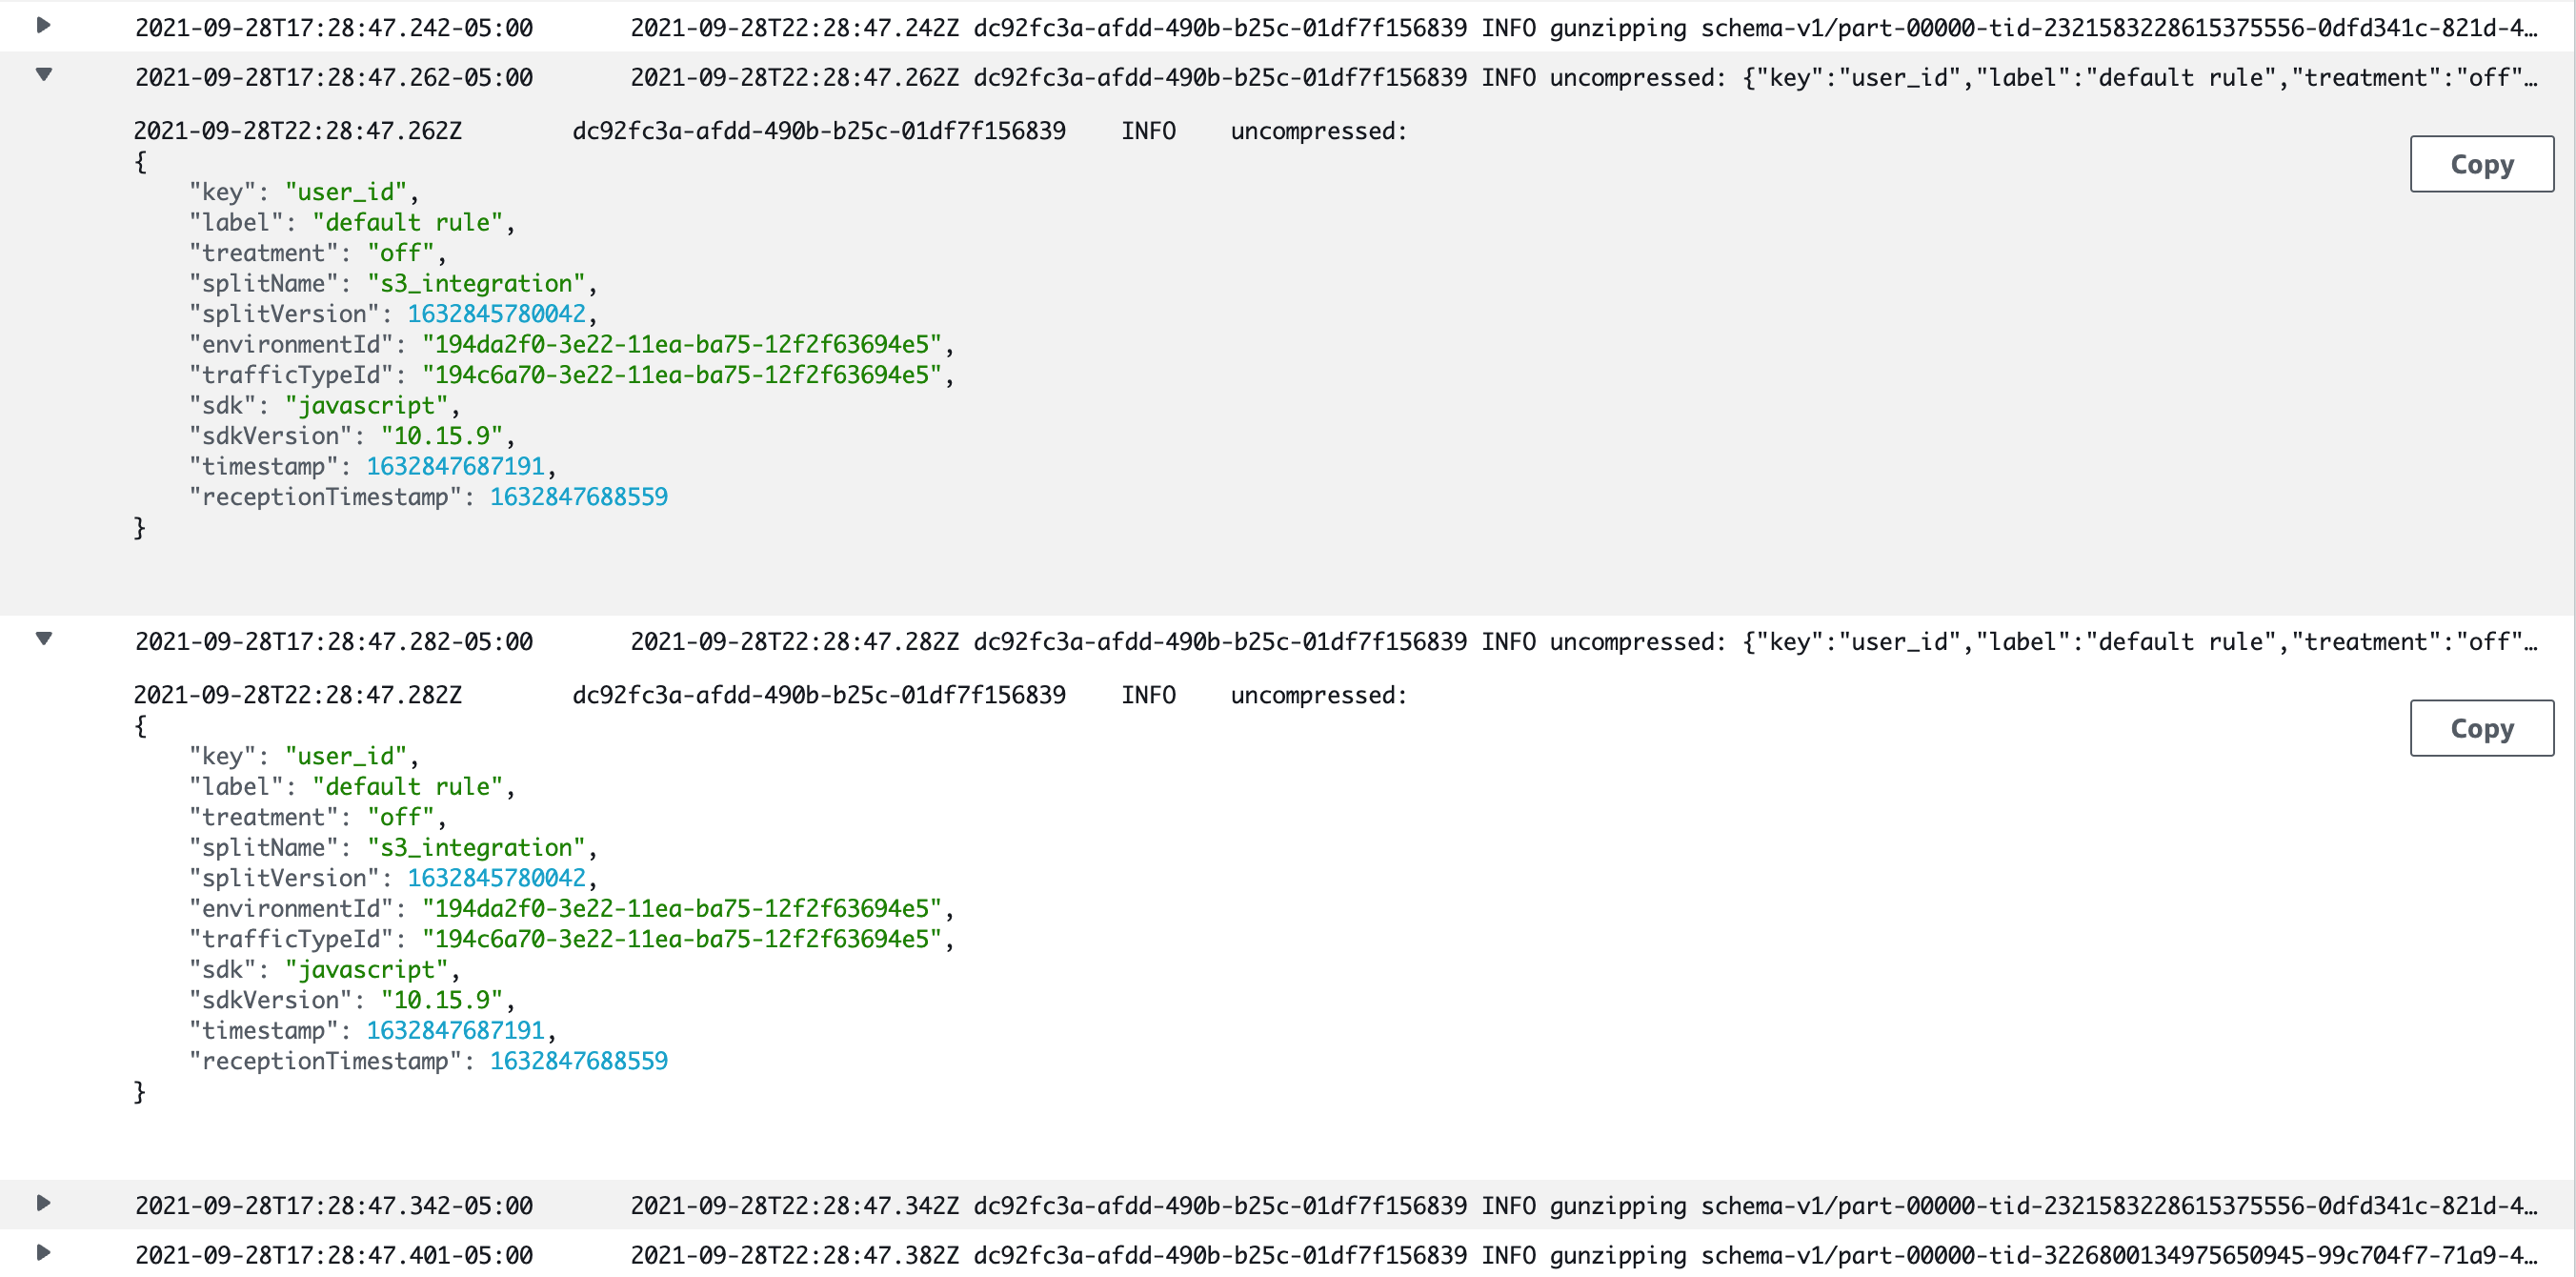
console.log('gunzipping ' + objectParams.Key);
await zlib.gunzip(data.Body, (err, buffer) => {
if(err) {
console.log(err);
} else {
console.log('uncompressed: ' + buffer.toString());
// once you have parsed the JSON, do with it as you will!
// write to another data store, or call an API...
}
});
}).promise();
// TODO delete the gipFiles after reading...
}
const response = {
statusCode: 200,
body: 'Hello Lambda!',
};
return response;
};
Save your index.js and zip up the entire directory in a single file, s3.zip. I do this by habit with the jar command, but you can zip with whatever tool you like:
jar -cvf s3.zip *
This zip needs to be recursive to include all the files that were downloaded when you ran your npm install commands.
Run the Lambda
Now back at the AWS Console, create a new Lambda. You can name it as you like. Upload the Lambda from the Code screen by using the button at the right Upload from…. Choose a .zip file and upload the ZIP you created in the previous step.
Now you can test it with any input (index.js ignores the request). Be sure to visit CloudWatch to check out your logs!
Schedule the Lambda
You can run your Lambda on a schedule. Add a delete operation to the script provided and you’ll clean up after yourself each time you finish parsing.
Summary
Use Split together with AWS for fun and profit! This is a draft article. If you have questions or suggestions, please provide them to the author: david.martin@split.io
Thank you!
Written with StackEdit.

Leave a comment